Mapping your farm
farmOS gives you the ability to organize all of the various places on (and off) your farm. These places are referred to as "Areas" in farmOS, and they can be referenced when you are logging events. They are specifically useful in movement logs for setting location of assets.
To create an area, go to the Farm Dashboard and click the "Add an area" button. This will take you to a form for defining an area. Here is a quick overview of the fields available to you when you are describing an area:
- Name - The first (and only) thing an area needs is a name. All the other fields are optional.
- Area type - farmOS uses the concept of "area type" to organize and color-code areas on a map. Some of the types available include: Property, Building, Field, and Water. The area type field is not required, but if you do not use it then the area will not be displayed on the main map.
- Geometry - The Geometry field lets you draw your area on a map, using points, lines, and polygons (see a more detailed description below).
- Description - This is a simple text tield that you can use to describe each area in further detail. It can be used to take notes, but it is recommended that any activities be recorded using logs instead, because they have a timestamp associated with them.
- Photo(s) - This field lets you attach photos to your area.
- Files - This field lets you attach files to your area. You can also use this to upload KML files and automatically import them into the Geometry field above (see more information below).
- Relations - The "Parent" and "Weight" fields let you define a hierarchy and order to your areas. You can edit these fields individually on each area, or you can use the drag-and-drop hierarchy editor - which is much easier for moving a lot of areas around at once (more details below).
- Flags - Flags can be added to areas (as well as assets and logs) for easier searching/filtering. Some flags are provided by default (eg: "Prioity", "Needs Review", "Monitor"), and modules can provide additional flags (eg: "Organic" and "Not Organic" provided by the [Organic module]).
Using geometry fields
Here are some common things you will do with the geometry fields in farmOS:
Zooming
There are three ways to zoom in/out:
- On touch screens, you can "pinch zoom" using two fingers.
- With a computer mouse, you can use the scroll wheel to zoom in/out.
- The plus (+) and minus (+) buttons in the top left of the map control zoom.
Geolocating
A "Geolocate" button is available in the top left of the map. This will use your device's GPS (if available) and/or IP-based geolocation service to try to find your current location and center the map on that point. While geolocation is turned on, your position will automatically update as you move around. In addition to the point, a circle will also be displayed around the point with an accuracy radius to tell you how confident the geolocated position is.
Address search
A search button is available in the left of the map (under the zoom buttons) for performing an address search. As you type into the search box, matching addresses will be displayed in a dropdown. Select the address that you want from that list and the map will be automatically re-centered on that location.
Drawing
There are four buttons for drawing shapes:
- Point: Click on the map to create a point.
- Line: Create a series of line segments by clicking points on the map, and double-clicking when you're done. You can also hold shift to draw freehand.
- Circle: Create a circle by clicking where you want the center to be, dragging the circle outward to expand it, and clicking again to finish.
- Polygon: A polygon works the same as a line, except it will create a closed shape at the end, whereas a line will not be filled in.
Modifying
There are three buttons for modifying shapes:
- Modify: Click the modify button, and then click a shape to select it. You can click and drag any of the vertices to modify the overall shape.
- Move: Click the move button, and then click a shape to select it. Then click and drag the shape to move it to a different position.
- Delete: The delete button will clear any selected shapes from the map. If you accidentally click this, refresh the page WITHOUT saving, and you will revert to the previously saved shapes. Note that this will also revert any other changes to your area that you haven't saved.
Importing a KML file
KML files are special shape files that define a geometry on a map. They can be created with various GIS/mapping software. If you already have your farm mapped in another software (like Google Earth), you can export KML files for each area and then import them into farmOS's geometry fields. Alternatively, you can use the Farm Area Import module to import a single KML file and break it up into multiple areas.
To import a KML file of an individual area, follow these steps:
- Create a new area (or edit an existing one).
- Scroll down to the Files field and upload your KML file.
- Scroll up to the Geometry field, and just below the map you will see a button labeled "Find using Files field". If you uploaded a valid KML file, you will see the shape(s) appear in the map.
To import a KML file with multiple areas, follow these steps:
- Enable the Farm Area Import module (if it isn't already).
- Click "Areas" in the main menu and then click the "Import" tab.
- Copy and paste the contents of your KML file into the text area, and click "Parse".
- If geometries are found in the KML file, a fieldset will be shown for each of them, letting you customize the area name, type, and whether or not it should be imported.
- At the bottom of the form, there is an option to create a new area that will contain all the imported areas. It is a good idea to use this so that you can easily review the areas that were imported, without having them mixed in with your existing areas right away. If you find that the import didn't work properly, you can select all the areas under this parent area and delete them in bulk.
Exporting a KML file
KML files can be exported from both areas and logs. Open the main Areas list, or any list of logs, select one or more, and click the "KML" button that appears at the bottom.
Remember to save!
When you're done modifying your area, remember to click the Save button at the bottom of the page to save your changes.
Organizing areas hierarchically
There are two ways to arrange areas hierarchically in farmOS:
- When you are editing an individual area, click "Relations" at the bottom and use the "Parent" and "Weight" values to define the area's relationship to other areas.
- Or, you can click and drag all your areas at once into a hierachal list. To do this, click on the Areas link in the main menu, and in the right column you will see a list of all your areas with a heading of "Hierachy (change)". Click "(change)" to be brought to the hierarchy editor. Click and drag the areas up and down, and left and right to arrange them how you want, and then click "Save" at the bottom of the page.
Generate beds
farmOS includes a special "Bed Generator" module that makes it easy to automatically generate a whole bunch of areas in bulk. The original goal was to make it easier to generate parallel beds within a field, but it may provide additional possibilities in the future.
To use the bed generator to generate beds, follow these steps:
- Go to the "Areas" page (from the main menu) and click the "Bed generator" tab.
- Select the field that the beds will be created within.
- Enter the number of beds that should be generated within the field.
- Set the orientation of the beds, and use the "Preview" button to see how they look.
- When you are satisfied with the preview, click the "Generate" button to generate the beds.
Beds will be numbered and labeled using the parent area's name.
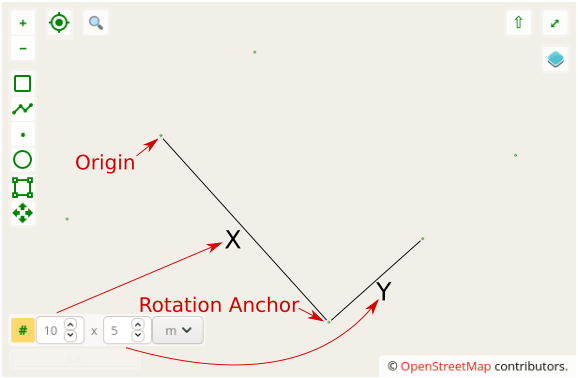
Use the Snapping Grid
FarmOS includes a "snapping grid" tool to aid in creating regular/aligned geometries. By default when drawing, the cursor will only snap to existing areas. However, the snapping grid adds a grid of evenly spaced points to which the cursor will snap preferentially.

To activate the grid, click the '#' icon in the bottom left corner above the scale line, then select two points. The first point is the "origin" of the grid while the second point we will call a "rotation anchor" and describes how the grid should be rotated around the origin point.
In addition to controlling the origin/rotation of the grid, its dimensions can
be specified. To do so, hovor your mouse over the '#' icon then enter the x and
y dimensions in the controls which appear.Since the grid can be rotated the
dimensions are independent of the compass directions on the map. Instead, the x
dimension represents the distances between the grid points on lines parallel with
the line formed by the origin and rotation anchor points. Similarly, the y dimension
represents distances perpendicular to that line.